
You can use your DNS server to control the inflow and outflow of your data to various telemetry (remote data measurement) collectors from Microsoft, Google, Apple, and others.
Understanding DNS and Its Importance
The Domain Name System (DNS) resolves domain names into IP addresses, which browsers use to load internet pages.
You are likely aware that when you load a webpage, the DNS server logs your IP requests.
Every device connected to the internet is mapped to its own IP address, used by other devices to locate it. Whenever your browser or a program connects to a server, not only do you receive information from that server, but that server also gets information from you.
Why Do We Need DNS Security?
Many services and websites log your DNS requests and can sell this data to advertisers. This data, connected to you through your browser fingerprint and disclosed personal information, is valuable.
If you use Windows, many services within the operating system share your data with Microsoft servers.
Do you know how your data are being used and what intelligence and predictive behavior models can be created from this data?
DNS is a huge privacy and censorship issue since the provider that handles your DNS requests knows all the pages you visit, and can do what they want with that data or sell it for profit.
Related: Are Google DNS or OpenDNS trustworthy options without a VPN?
Learn more about choosing DNS servers.
DNS Threats
- DNS Tracking: Your ISP can see all the domains your computer resolves to if you use their DNS servers. Re: The Privacy Risk of Using Your ISP’s DNS. ISPs can target you for certain services and/or sell your data to advertisers.
- DNS Leakage: When using a VPN or Tor, sometimes your web traffic is not fully routed through your chosen DNS server but instead goes back to your ISP’s DNS server, making it visible to your ISP.
- DNS Redirection to Malicious Sites: Attackers can send phishing emails and substitute their domain IP address for the one you think you are resolving to, such as your bank or other important accounts. In some cases, ISPs might prevent access to certain domains by redirecting your IP request to an “approved” site.
Solutions to DNS Threats
Utilizing a service like OpenDNS or Pi-hole can block DNS resolution to undesirable sites. You can also configure individual machines to achieve the same result.
- OpenDNS: A third-party DNS service that can block unwanted sites and provide additional security features.
- Pi-hole: A service you can host yourself on any Ubuntu-running hardware. Pi-hole blocks ad servers from loading when you browse, preventing a lot of data about you from being shared with those servers. This also conserves bandwidth.
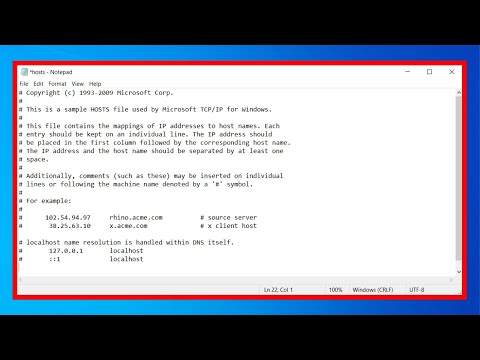
You can use both approaches, and if you need access to a site on a specific machine, configure that machine’s HOSTS file to resolve to the correct IP. The computer will look at its HOSTS file before consulting the remote DNS server.
Individual machine controls are preferable if you need to use specific services from Microsoft but want to block most telemetry. For example, you can allow DNS resolution to OneDrive but block other connections for other machines.
Benefits of Installing Pi-Hole
Pi-hole provides an additional layer of protection by blacklisting certain sites, preventing them from loading, and filtering out unwanted content. By using secure DNS servers both at home and at work, you can avoid unnecessary risks and the potential for malicious attacks, as well as the collection and sale of personal data.
By preventing ads from loading, you also conserve bandwidth. Win-win!

DNS protection provides an additional layer of protection between your computer and the internet by blacklisting certain sites, preventing sites from loading, and filtering out unwanted content. By using secure DNS servers both at home and at work, users can avoid unnecessary risks and the potential for malicious attack, not to mention the collection and sale of personal data.
Installing Pi-hole as a Recursive DNS Server
Follow these steps to install Pi-hole on an Ubuntu server:
1. Install Ubuntu Server 20.04:
2. Install Pi-hole:
sudo curl -sSL https://install.pi-hole.net | bash3. Set the Web Admin Password:
pihole -a -p [password]4. Install Unbound DNS:
sudo apt install unbound5. Create Unbound Configuration File:
sudo nano /etc/unbound/unbound.conf.d/pi-hole.conf6. Copy Example Config:
- Follow the instructions at Pi-hole’s documentation
7. Restart Unbound to apply Configuration:
sudo service unbound restart8. Disable Forwarding DNS in Pi-hole and Set Custom DNS in Pi-hole to 127.0.0.1#5335
9. Done!
- Bonus points for sending all DNS traffic through a VPN Gateway to encrypt all outbound requests – https://youtu.be/xFficDCEv3c
